本文將阐述從HomeLab選型購買、裝機到系統安裝的一次完整的實踐。
0x00 需求分析
直接上需求
- 低價
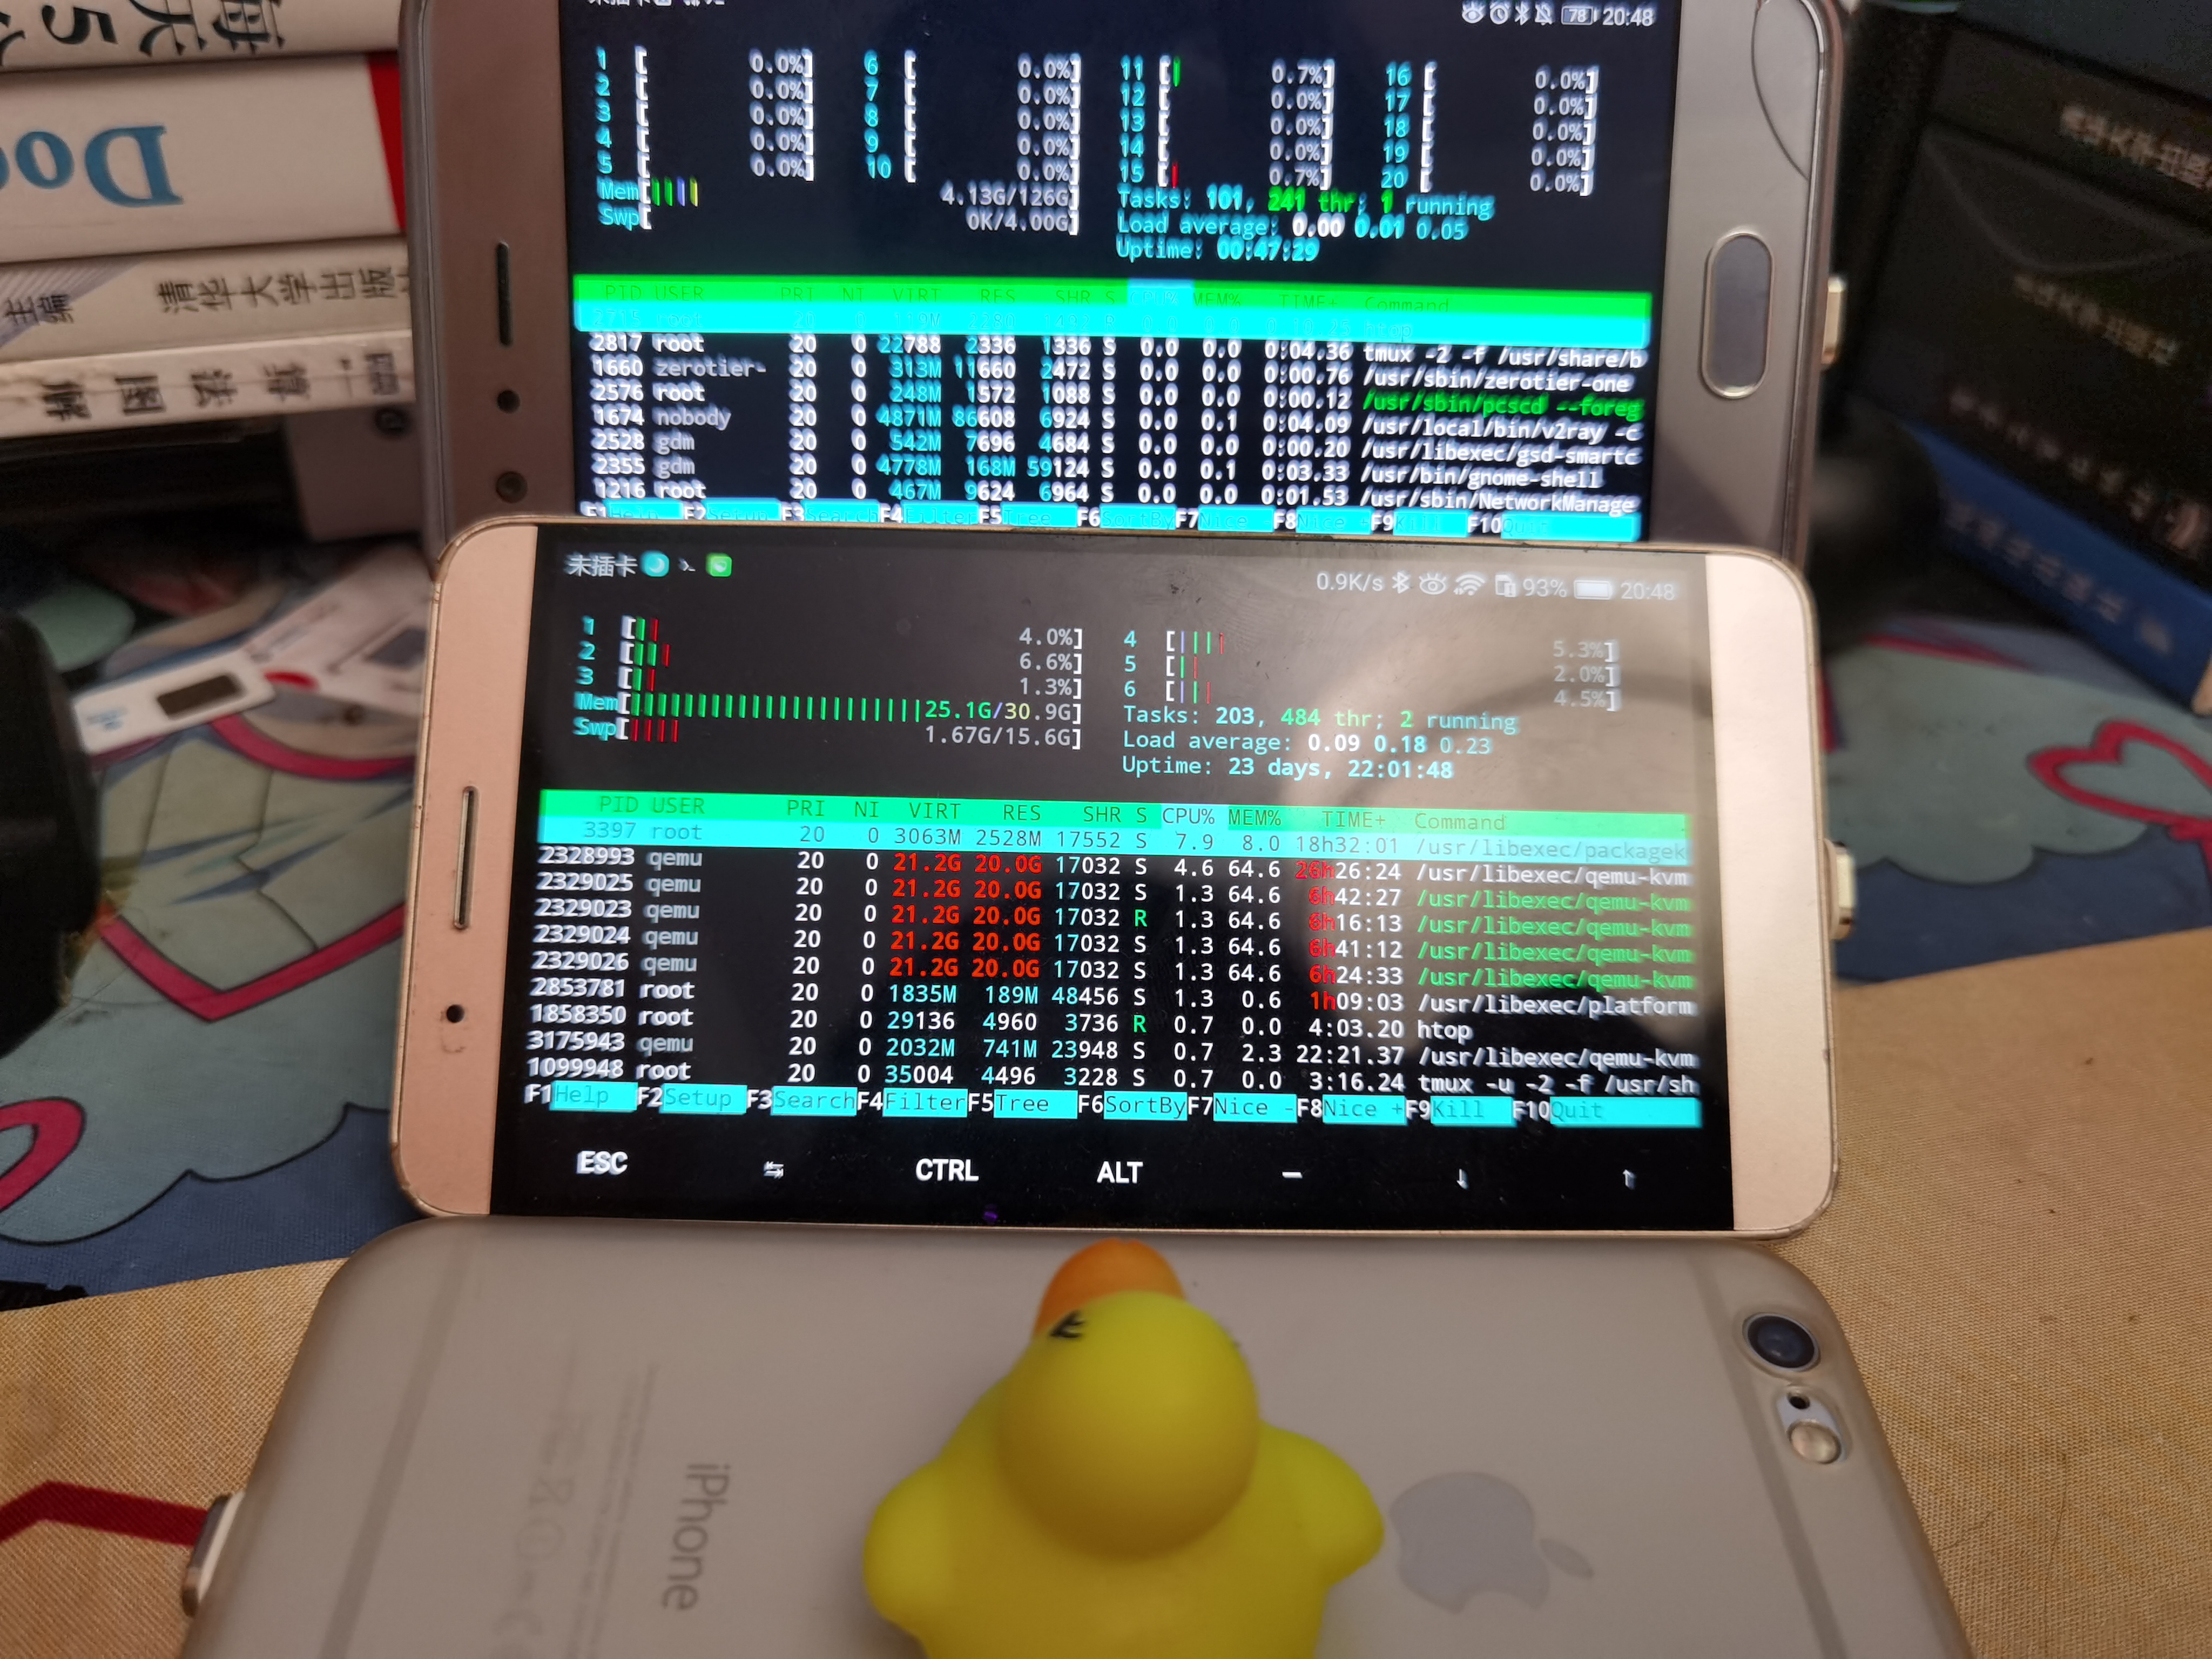
- 大内存,128 GiB起步
- 功耗低、靜音
- Intel多核心CPU,滿足KVM虛擬機多開場景
- 保留顯卡升級通道
- 適配RHEL
0x01 硬件選購
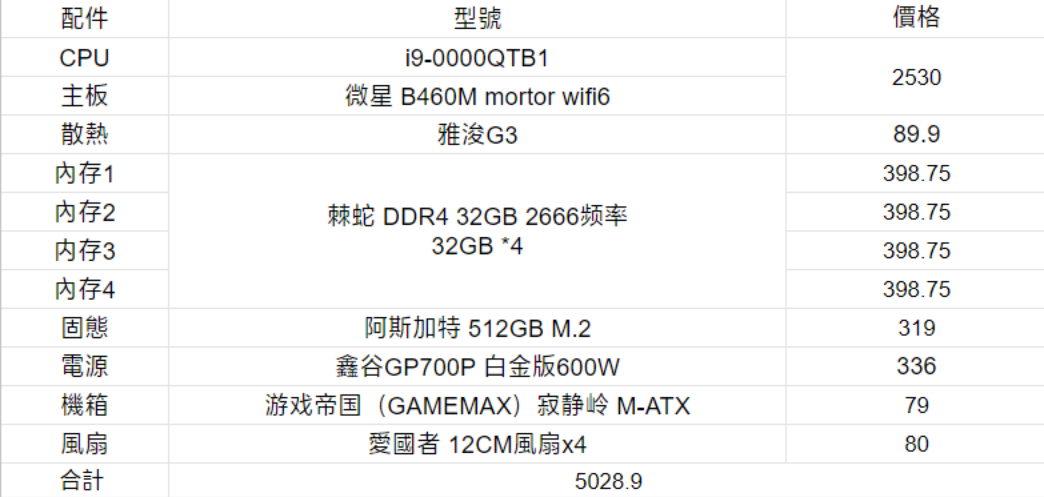
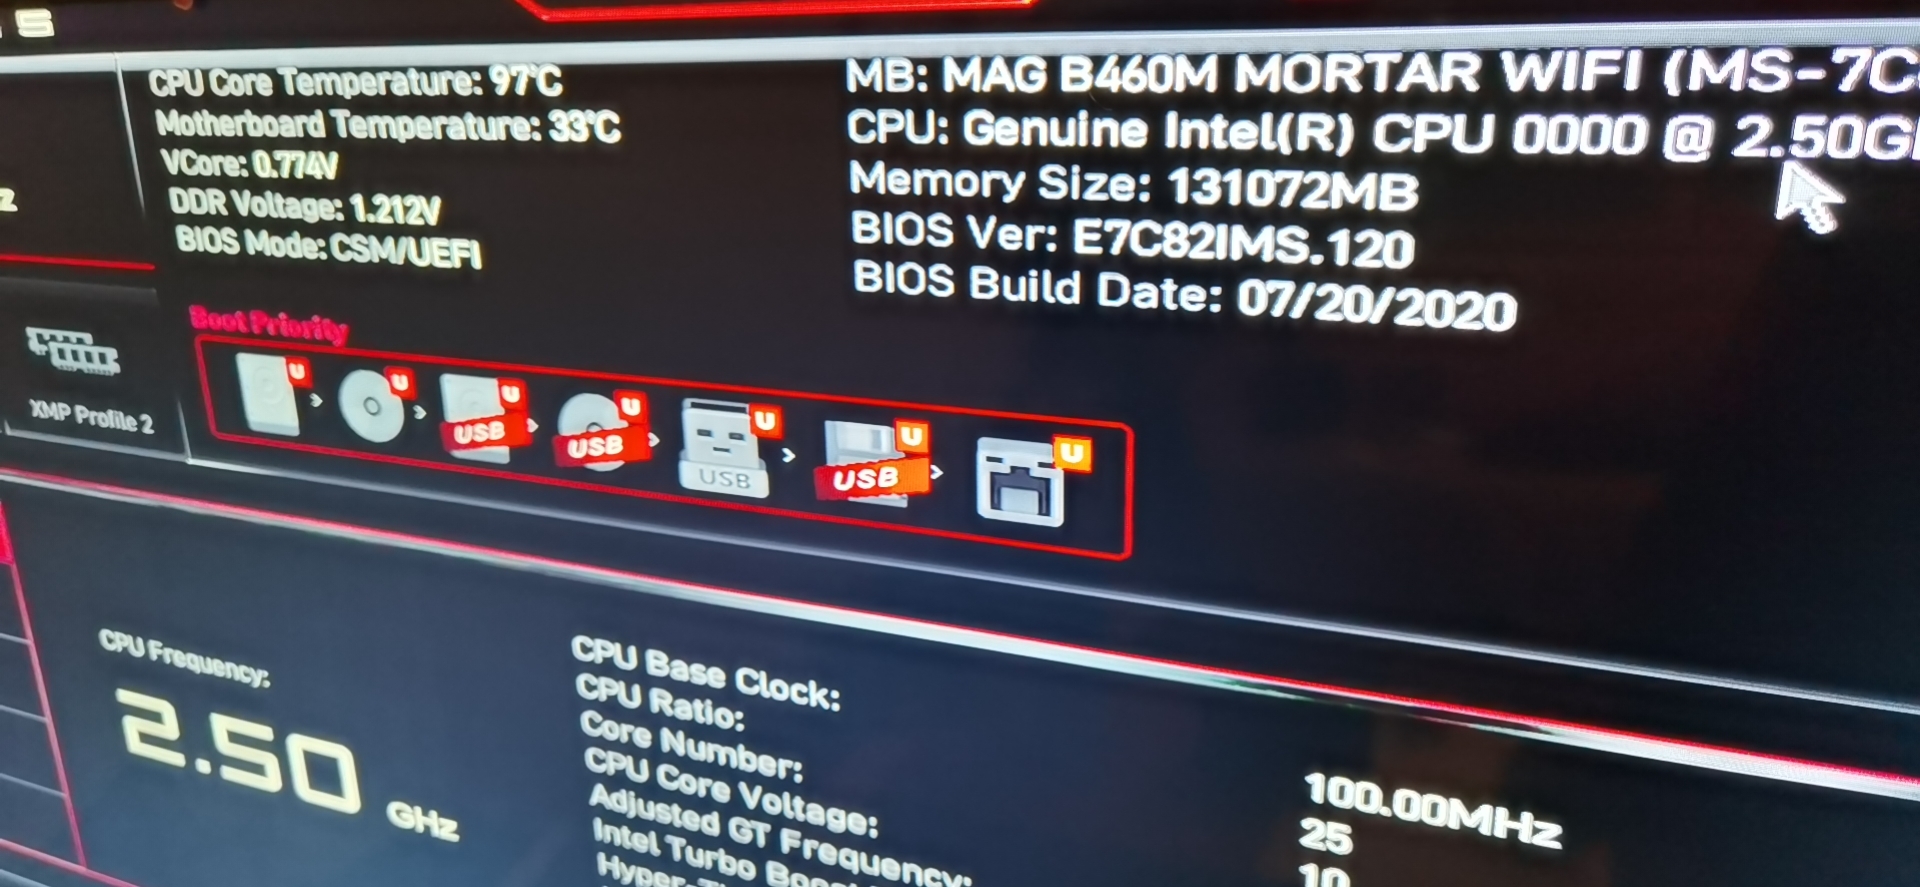
芯片:i9十代測試版QTB1,10C20T,定位是家用靜音低功耗,
主板:選擇了自帶wifi6的主板,搭配房間華爲wif6+ 使用,大小符合MATX大小。
散熱:i9 不講武德,不加散熱直接97℃,標配散熱。
内存:馬甲條子,容量和頻率+京東自營,要啥自行車。
固態:500GiB起步,本人機械硬盤絕緣體。
電源:500W夠用,600W合適,700W富裕。600W保留以後顯卡升級的功耗。
機箱:最便宜的就夠。
風扇:最便宜的就夠+1。
0x02 上手安装
i9散熱不講武德
(拍這個照片的時候我還發著不塗硅脂免得不好退貨這種白日夢,甚至塗了還不上散熱被熱熔了差點漏到芯片針脚。)
靈魂走綫
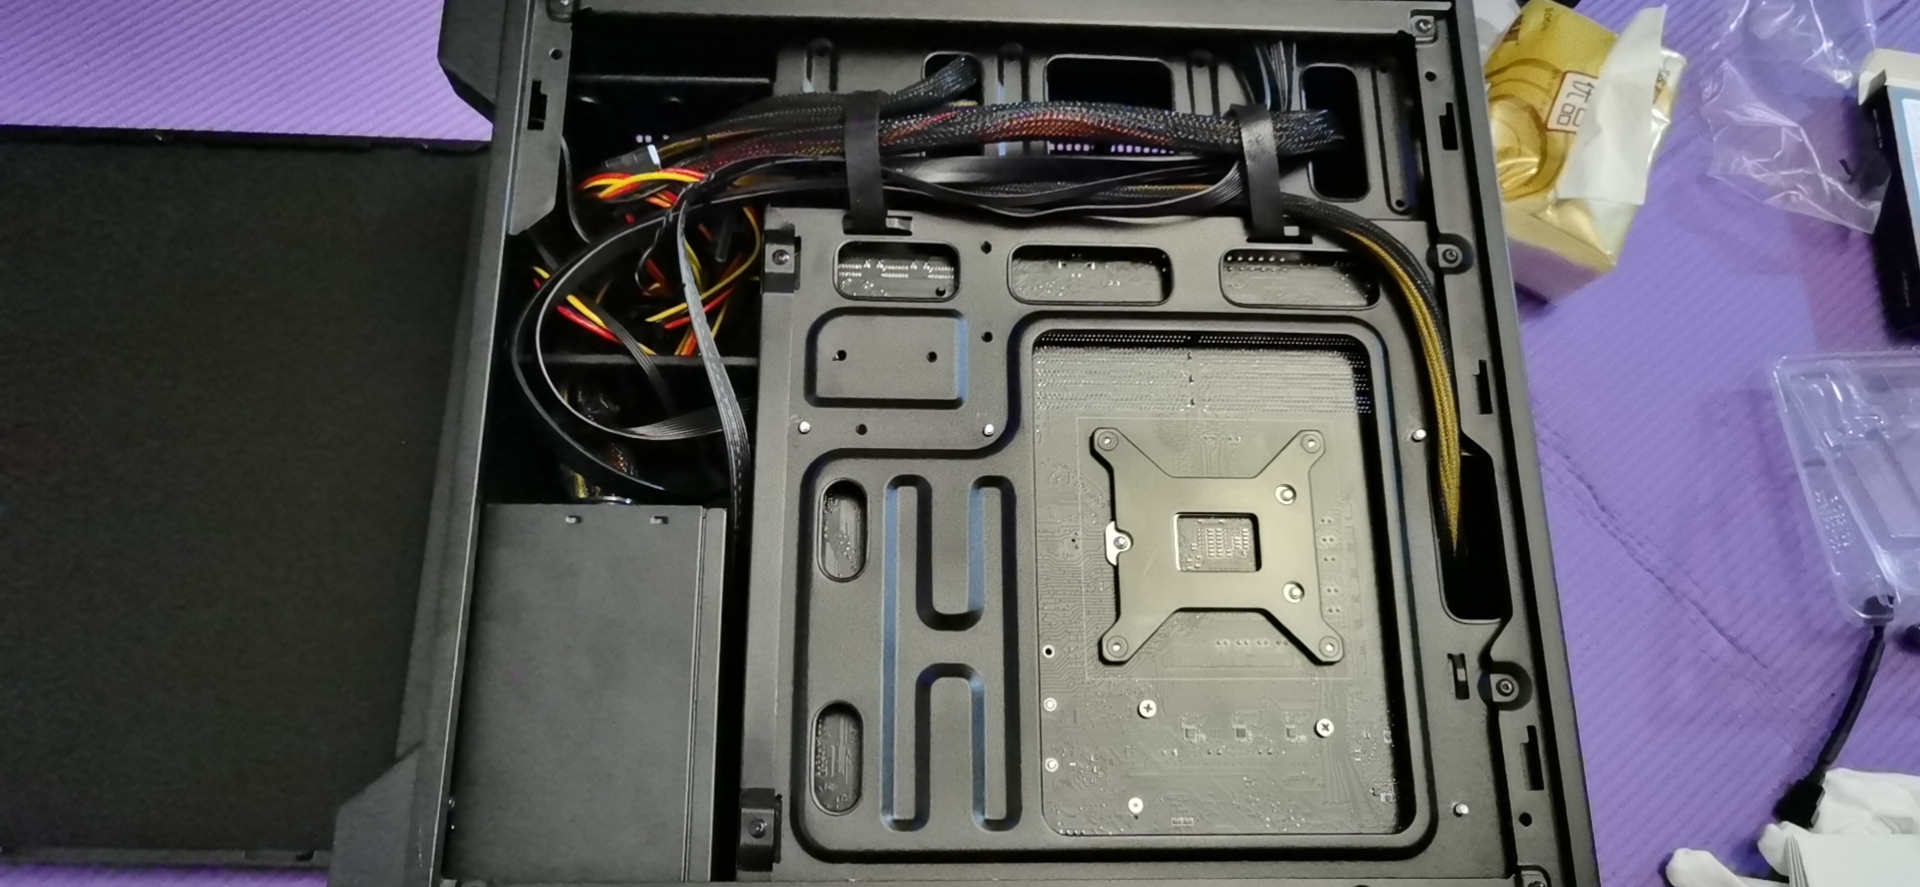
正面來一張

成品
0x03 系統安裝
簡單講一下遇到的坑和解決的方法
官方訂閲與epel第三方倉庫
1
2
[root@rhel7 ~]# subscription-manager repos --enable "rhel-*-server-rpms" --enable "rhel-*-server-extras-rpms" "rhel-*-optional-rpms" --enable "rhel-*-extras-rpms"  --enable "rhel-ha-for-rhel-*-server-rpms"
[root@rhel7 ~]# yum install https://dl.fedoraproject.org/pub/epel/epel-release-latest-7.noarch.rpm
主板網卡驅動
需手動配置靜態IP。
1
2
3
4
5
6
7
8
9
10
11
12
[root@rhel7 ~]# yum install https://mirror.rackspace.com/elrepo/elrepo/el7/x86_64/RPMS/kmod-r8125-9.003.05-1.el7_8.elrepo.x86_64.rpm
[root@rhel7 ~]# ethtool -i enp9s0
driver: r8125
version: 9.003.05-NAPI
firmware-version:
expansion-rom-version:
bus-info: 0000:09:00.0
supports-statistics: yes
supports-test: no
supports-eeprom-access: no
supports-register-dump: yes
supports-priv-flags: no
安裝byobu
右下角時間不顯示,更換老舊版本解決。
1
[root@rhel7 ~]# yum install https://rpmfind.net/linux/openmandriva/4.0/repository/x86_64/unsupported/release/byobu-5.43-2-omv4000.noarch.rpm
硬盤識別順序
RHEL7識別硬盤系統有固定順序而不像RHEL8,而加裝的B/M key m.2只能在特定槽位被識別。硬盤擴容流程如下:
1
2
3
4
5
6
7
8
9
10
11
12
13
14
15
16
17
18
19
20
21
22
23
24
25
26
27
28
29
30
31
32
33
34
35
36
37
38
39
40
41
42
43
44
45
46
47
48
49
50
51
52
53
54
55
56
57
58
59
60
61
62
63
64
65
66
67
68
69
70
71
72
73
74
75
76
77
78
79
80
81
82
83
84
85
86
87
88
89
90
91
92
93
94
95
96
97
98
99
100
101
102
103
104
105
106
107
108
109
110
111
112
#直接用之前試裝RHEL8的操作步驟進行記錄,懶
#如果決定整盤擴容,分不分區都隨便。以下分區步驟僅做記錄,RHEL7上沒有分區。
[root@rhel8-m4d3bug ~]# lsblk
NAME          MAJ:MIN RM   SIZE RO TYPE MOUNTPOINT
sda             8:0    0 238.5G  0 disk
├─sda1          8:1    0   600M  0 part /boot/efi
├─sda2          8:2    0     1G  0 part /boot
└─sda3          8:3    0 236.9G  0 part
  ├─rhel-root 253:0    0 182.9G  0 lvm  /
  ├─rhel-swap 253:1    0     4G  0 lvm
  └─rhel-home 253:2    0    50G  0 lvm  /home
nvme0n1       259:0    0 465.8G  0 disk                     < --- 新盤
[root@rhel8-m4d3bug ~]# fdisk /dev/nvme0n1

Welcome to fdisk (util-linux 2.32.1).
Changes will remain in memory only, until you decide to write them.
Be careful before using the write command.

Device does not contain a recognized partition table.
Created a new DOS disklabel with disk identifier 0xf65c9eab.

Command (m for help): n
Partition type
   p   primary (0 primary, 0 extended, 4 free)
   e   extended (container for logical partitions)
Select (default p):

Using default response p.
Partition number (1-4, default 1):
First sector (2048-976773167, default 2048):
Last sector, +sectors or +size{K,M,G,T,P} (2048-976773167, default 976773167):

Created a new partition 1 of type 'Linux' and of size 465.8 GiB.

Command (m for help): t
Selected partition 1
Hex code (type L to list all codes): 8e
Changed type of partition 'Linux' to 'Linux LVM'.

Command (m for help): w
The partition table has been altered.
Calling ioctl() to re-read partition table.
Syncing disks.

[root@rhel8-m4d3bug ~]# lsblk
NAME          MAJ:MIN RM   SIZE RO TYPE MOUNTPOINT
sda             8:0    0 238.5G  0 disk
├─sda1          8:1    0   600M  0 part /boot/efi
├─sda2          8:2    0     1G  0 part /boot
└─sda3          8:3    0 236.9G  0 part
  ├─rhel-root 253:0    0 182.9G  0 lvm  /
  ├─rhel-swap 253:1    0     4G  0 lvm
  └─rhel-home 253:2    0    50G  0 lvm  /home
nvme0n1       259:0    0 465.8G  0 disk
└─nvme0n1p1   259:2    0 465.8G  0 part

lv在vg之上,vg在pv之上,直接pvcreate然後vgextend

[root@rhel8-m4d3bug ~]# pvs
  PV         VG   Fmt  Attr PSize    PFree
  /dev/sda3  rhel lvm2 a--  <236.89g    0
[root@rhel8-m4d3bug ~]# vgs
  VG   #PV #LV #SN Attr   VSize    VFree
  rhel   1   3   0 wz--n- <236.89g    0
[root@rhel8-m4d3bug ~]# lvs
  LV   VG   Attr       LSize    Pool Origin Data%  Meta%  Move Log Cpy%Sync Convert
  home rhel -wi-ao----   50.00g
  root rhel -wi-ao---- <182.89g
  swap rhel -wi-a-----    4.00g

[root@rhel8-m4d3bug ~]# pvcreate /dev/nvme0n1p1
WARNING: xfs signature detected on /dev/nvme0n1p1 at offset 0. Wipe it? [y/n]: y
  Wiping xfs signature on /dev/nvme0n1p1.
  Physical volume "/dev/nvme0n1p1" successfully created.
[root@rhel8-m4d3bug ~]# pvs
  PV             VG   Fmt  Attr PSize    PFree
  /dev/nvme0n1p1      lvm2 ---   465.76g 465.76g
  /dev/sda3      rhel lvm2 a--  <236.89g      0
[root@rhel8-m4d3bug ~]# vgextend rhel /dev/nvme0n1p1
  Volume group "rhel" successfully extended

完成extend后可以看到已經有所屬的vg
[root@rhel8-m4d3bug ~]# pvs
  PV             VG   Fmt  Attr PSize    PFree
  /dev/nvme0n1p1 rhel lvm2 a--  <465.76g <465.76g
  /dev/sda3      rhel lvm2 a--  <236.89g       0

rhel的vg也已經擴展成功
[root@rhel8-m4d3bug ~]# vgs
  VG   #PV #LV #SN Attr   VSize   VFree
  rhel   2   3   0 wz--n- 702.64g <465.76g

進行lv擴展
[root@rhel8-m4d3bug ~]# lvs
  LV   VG   Attr       LSize    Pool Origin Data%  Meta%  Move Log Cpy%Sync Convert
  home rhel -wi-ao----   50.00g
  root rhel -wi-ao---- <182.89g
  swap rhel -wi-a-----    4.00g
[root@rhel8-m4d3bug ~]# pvs
  PV             VG   Fmt  Attr PSize    PFree
  /dev/nvme0n1p1 rhel lvm2 a--  <465.76g <465.76g
  /dev/sda3      rhel lvm2 a--  <236.89g       0

將剩餘的100%加到/上
[root@rhel8-m4d3bug ~]# lvextend -l +100%FREE /dev/rhel/root
  Size of logical volume rhel/root changed from <182.89 GiB (46819 extents) to 648.64 GiB (166053 extents).
  Logical volume rhel/root successfully resized.
[root@rhel8-m4d3bug ~]# lvs
  LV   VG   Attr       LSize   Pool Origin Data%  Meta%  Move Log Cpy%Sync Convert
  home rhel -wi-ao----  50.00g
  root rhel -wi-ao---- 648.64g
  swap rhel -wi-a-----   4.00g
cockpit全家桶
1
2
3
4
[root@rhel7 ~]# yum install cockpit* -x cockpit-machines-ovirt
[root@rhel7 ~]# systemctl enable cockpit --now
[root@rhel7 ~]# firewall-cmd --add-services cockpit
[root@rhel7 ~]# firewall-cmd --reload
v2ray客戶端
1
2
v2fly/fhs-install-v2ray: Bash script for installing V2Ray in operating systems such as Debian / CentOS / Fedora / openSUSE that support systemd
https://github.com/v2fly/fhs-install-v2ray
zerotier
1
[root@rhel7 ~]# curl -s https://install.zerotier.com/ | sudo bash
0x04 後記
後續打算:
- OCP4HA集群環境搭建。
- 靶機搭建。
- K8SHA集群環境搭建。