本文將簡單搭建一個基於PXE網卡分發iPXE 使用Kickstart自動化安裝BIOS或UEFI架構的自動化安裝環境。其中dnsmasq&httpd將運行在同一個機器底下。
采用的方式是通过已有的PXE固件来分发ipxe引导程序进行安装。
沒仔細看是不是以爲我一篇博客寫水 Satellite , OpenStack 乃至於Openshift 之中都有應用。因此來簡單學習一下。
0x00 環境準備 重複的東西不再贅述,谷歌商店安裝Link to Text Fragment直接跳轉騙點擊率
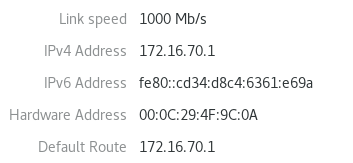
設置自定義IP
0x01 開始 安裝必需包 這次選用dnsmasq來提供ftp和dhcp功能,借此學習一波。
提取引導程序文件undionly.kpxe 和ipxe.efi ,并自建菜單boot.ipxe。
1
2
3
4
5
6
7
8
9
10
11
12
13
14
15
16
17
18
~] ~] ~] ~] ~] menu PXE Boot Options item shell iPXE shell item exit Exit to BIOS choose --default exit --timeout 10000 option && goto ${option} :shell shell :exit exit EOF
0x02 配置Dnsmasq服務器 修改配置 參考以下行號來查找内容進行添加/修改。
1
2
3
4
5
6
7
8
9
10
11
12
13
14
~] 10 port=0 <---禁用dns功能 106 interface=ens38 <---对应工作的网口 111 listen-address=172.16.70.1 <---本机用于监听的地址 164 dhcp-range=172.16.70.200,172.16.70.254,255.255.255.0 <---设定相关的dhcp起始地址及掩码 303 dhcp-vendorclass=BIOS,PXEClient:Arch:00000 <---Send extra options which are tagged as "BIOS" to any machine whose DHCP vendorclass string includes the substring "PXEClient" 341 dhcp-option=option:router,172.16.70.1 <---设置router选项为默认网关 351 dhcp-option=option:netmask,255.255.255.0 <---设置子网掩码 450 dhcp-match=set :ipxe,175 <---iPXE sends a 175 option. 451 dhcp-boot=tag:!ipxe,tag:BIOS,undionly.kpxe <---BIOS标签的引导至undionly.kpxe 452 dhcp-boot=tag:!ipxe,tag:!BIOS,ipxe.efi <---非BIOS标签的引导至ipxe.efi 453 dhcp-boot=tag:ipxe,menu/boot.ipxe <---设置它们的菜单文件为boot.ipxe 499 enable -tftp <---启用tftp 502 tftp-root=/var/lib/tftpboot <---设置tftp的目录
啓動服務 1 2 3 ~] Created symlink from /etc/systemd/system/multi-user.target.wants/dnsmasq.service to /usr/lib/systemd/system/dnsmasq.service. ~]
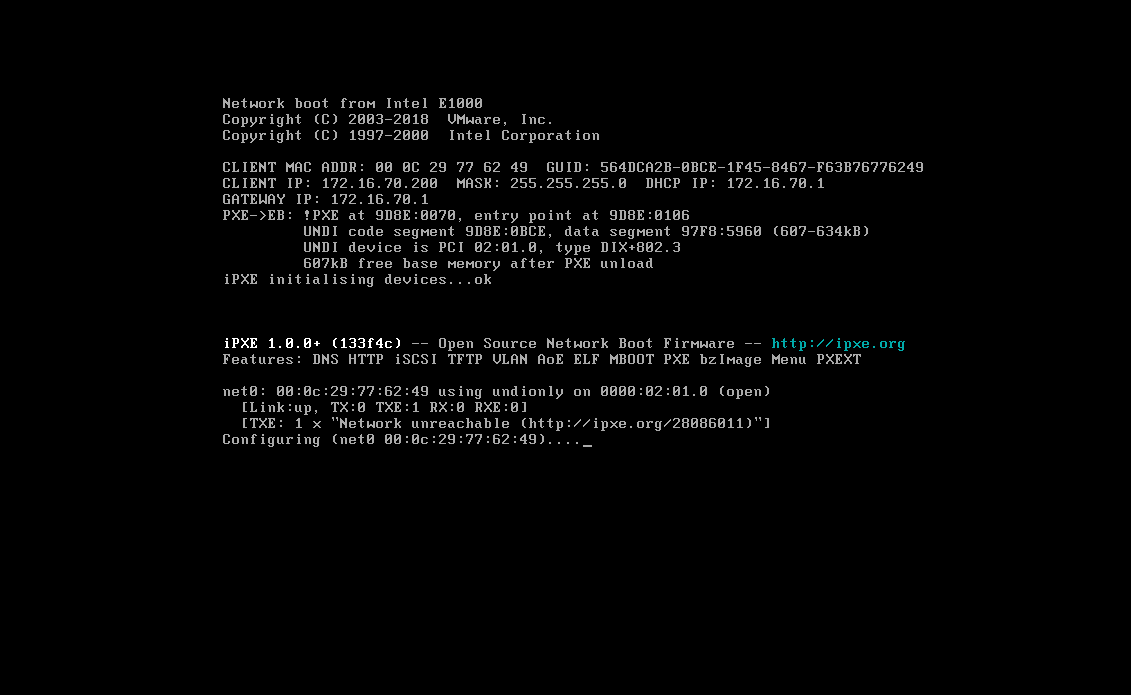
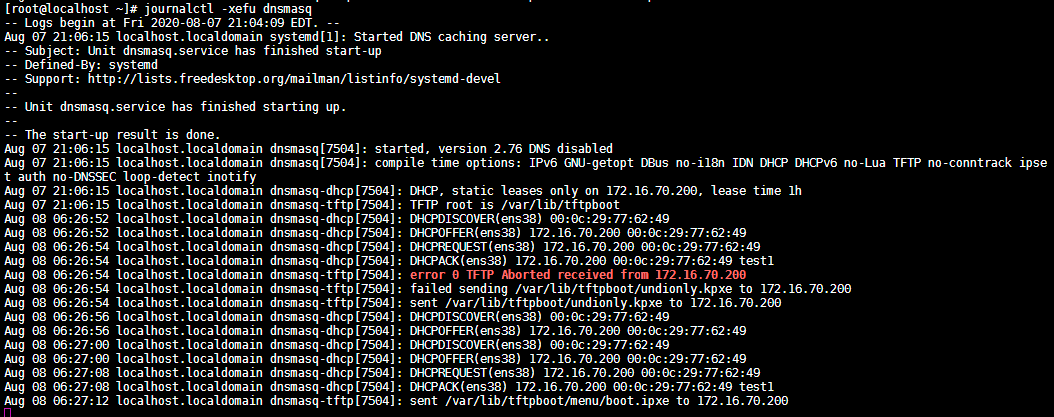
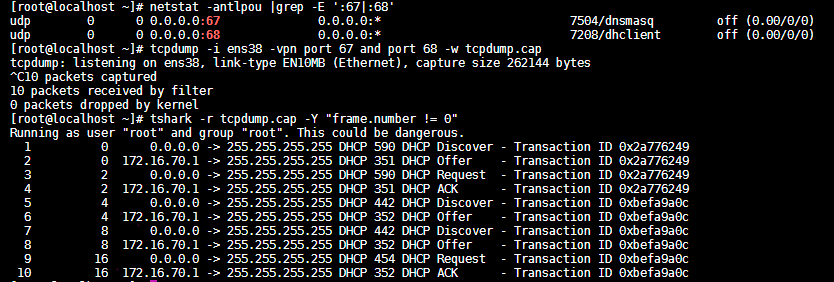
檢查DHCP工作情況 在相同LAN下啓動無盤VM用於測試DHCP,測試期間檢查:開機提示、日志和抓包。
0x03 配置網絡安裝源 使用HTTP來提供repo源 1 2 3 4 5 6 7 8 9 10 11 12 13 14 15 16 17 18 19 20 21 22 23 24 25 26 27 28 29 30 31 32 33 34 35 36 37 38 39 40 41 42 43 44 45 46 47 48 49 50 51 52 53 54 55 56 57 ~] ~] ~] ~] ~] Filesystem Type Size Used Avail Use% Mounted on /dev/mapper/rhel-root xfs 54G 8.4G 46G 16% / devtmpfs devtmpfs 937M 0 937M 0% /dev tmpfs tmpfs 954M 0 954M 0% /dev/shm tmpfs tmpfs 954M 11M 944M 2% /run tmpfs tmpfs 954M 0 954M 0% /sys/fs/cgroup /dev/sda1 xfs 1.1G 186M 878M 18% /boot /dev/mapper/rhel-home xfs 50G 34M 50G 1% /home tmpfs tmpfs 191M 50k 191M 1% /run/user/0 /dev/sr0 iso9660 4.5G 4.5G 0 100% /run/media/root/RHEL-7.6 Server.x86_64 /dev/loop0 iso9660 4.5G 4.5G 0 100% /var/www/html/media/rhel7/7.6 ~] Created symlink from /etc/systemd/system/multi-user.target.wants/httpd.service to /usr/lib/systemd/system/httpd.service. ~] ~] * About to connect() to 172.16.70.1 port 80 ( * Trying 172.16.70.1... * Connected to 172.16.70.1 (172.16.70.1) port 80 ( > GET /media/rhel7/7.6 HTTP/1.1 > User-Agent: curl/7.29.0 > Host: 172.16.70.1 > Accept: */* > < HTTP/1.1 301 Moved Permanently < Date: Sat, 08 Aug 2020 11:53:20 GMT < Server: Apache/2.4.6 (Red Hat Enterprise Linux) < Location: http://172.16.70.1/media/rhel7/7.6/ < Content-Length: 243 < Content-Type: text/html; charset=iso-8859-1 < * Ignoring the response-body * Connection * Issue another request to this URL: 'http://172.16.70.1/media/rhel7/7.6/' * Found bundle for host 172.16.70.1: 0x2648e90 * Re-using existing connection! ( * Connected to 172.16.70.1 (172.16.70.1) port 80 ( > GET /media/rhel7/7.6/ HTTP/1.1 > User-Agent: curl/7.29.0 > Host: 172.16.70.1 > Accept: */* > < HTTP/1.1 200 OK < Date: Sat, 08 Aug 2020 11:53:20 GMT < Server: Apache/2.4.6 (Red Hat Enterprise Linux) < Content-Length: 3691 < Content-Type: text/html;charset=ISO-8859-1 ... ~] ~] ~]
菜單加入HTTP鏈接 1 2 3 4 5 6 7 8 9 10 11 12 13 14 15 16 17 18 19 20 21 22 ~] :start menu PXE Boot Options item shell iPXE shell item rhel7-net RHEL 7 installation item exit Exit to BIOS choose --default rhel7-net --timeout 10000 option && goto ${option} :shell shell :rhel7-net set server_root http://172.16.70.1/media/rhel7/7.6initrd ${server_root} /images/pxeboot/initrd.images kernel ${server_root} /images/pxeboot/vmlinuz inst.repo=${server_root} inst.ks=http://172.16.70.1/ks/bios-ks.cfg ip=dhcp ipv6.disable inst.geoloc=0 devfs=nomount boot :exit exit
0x04 Kickstart文件編寫 不再贅述
0x05 結語 本文簡單嘗試在PXE的網卡環境下調用iPXE固件,除了本文的方法之外,還有以下有趣实现水貼方向
这里特别说明下一项关键技术iPXE,iPXE是预引导执行环境(PXE)客户端固件和引导程序的开源实现,可用于启用没有内置PXE支持的计算机从网络引导。虽然标准化PXE客户端使用TFTP传输数据,但非标准化iPXE客户端固件增加了通过其他协议检索数据的功能,包括HTTP,iSCSI,以太网ATA(AoE)和以太网光纤通道(FCoE)。
为什么在有的云厂商裸金属云服务介绍上,能看到分钟级的裸金属服务器交付,就是使用了iPXE的技术,服务器启动,通过iPXE引导已经制作好的iSCSI系统镜像,这样就免去了安装操作系统的过程,并且服务器也不需要系统硬盘,节省了成本。并且这样更为灵活,通过这样的技术,可以实现用户根据需要制定自己的系统镜像,而且方便镜像虚实转换,镜像机可以用于启动云主机,也可以启动物理机!
另外以下是關於iPXE與PXE較爲準確的解釋 :
pxe是一个协议,跟mbr是一个性质的东西,它规定了CPU启动后通过什么方式获取引导代码并执行。
pxe的实现有许多,不同的厂商有不同的实现。并且pxe的实现代码主要有两种存放位置,一种是存在主板上,一种是存在网卡里,现在新的网卡一般都自带了pxe的实现代码。(去mbr查找引导代码的实现是在主板上的。)
由于pxe协议比较“落后”,仅支持tftp传输数据,性能差,灵活性也差,于是有了gpxe这个项目。gpxe是一种兼容pxe的实现,并且在pxe之上增加了许多特性,例如通过http/ftp等协议传输数据。
gpxe原先使用的域名的拥有者突然收回了该域名的使用权,于是这些人fork出去做了ipxe,gpxe现在已经不再开发,ipxe开发非常活跃。
一些较新的intel的网卡里都带了gpxe的实现代码,最新的可能会带ipxe代码。
pxelinux是syslinux项目的一个部分,syslinux主要有三个产出,syslinux、isolinux、pxelinux,分别用于硬盘、光盘、网络启动,它的角色与grub相同。
*.bin 和 *.0 文件一般是一样的,不过使用上有一些区别,下面解释
pxelinux.bin 是 pxelinux 编译后生成的文件
由于大多数网卡、主板都不自带gpxe/ipxe的代码,所以通常引导时需要这样的途径: pxe -> ipxe -> pxelinux.bin,后面这两步可以合并,于是大家就把ipxe与pxelinux.bin的代码合体,做成了 ipxelinux.0 (gpxe+pxelinux.bin = gpxelinux.0)。一般习惯上裸的pxelinux镜像用.bin后缀,加上gpxe/ipxe之后用.0后缀。此外还会有.lkrn后缀,这是ipxe的东西,ipxe的代码默认只能通过pxe协议的方式加载,他们搞了另外一个代码入口,使得可以通过像linux kernel的方式一样加载(就是可以通过grub引导),这种镜像的后缀是lkrn.
所以可行的引导过程可以有这些:
pxe(网卡) -> ipxe -> pxelinux.bin -> menu.c32
pxe -> ipxelinux.0 -> menu.c32
pxe -> syslinux.bin -> ipxe -> pxelinux.bin -> menu.c32
pxe -> syslinux.bin -> ipxelinux.0 -> menu.c32
grub -> ipxe.lkrn -> pxelinux.bin -> menu.c32
grub -> ipxelinux.lkrn -> menu.c32
ipxe(烧入网卡) -> pxelinux.bin
…
由于pxe代码是主板、网卡自带的,所以兼容性最好(至少本机的代码兼容本机的设备)。而ipxe兼容性略差(只是相对来说,因为我们编译时可能会漏掉一些网卡,或者一些特殊问题不好解决),曾经尝试过直接一步 pxe -> ipxelinux.0,但是发现有一些机器无法启动,加载ipxe之后就停住了。所以后来退而求其次,用两步加载,对于ipxe不支持的设备,可以在第一步pxe->pxelinux.bin之后手快一些按任意键中断,然后仍然可以使用pxe,不过之后我们一直没有维护通过tftp加载的pxelinux以及配置文件,所以那部分内容其实现在都已经严重过时了。
0x06 鸣谢